| Index |
Filling Class V Cavities
With Gold Foil
W. E. HARPER, D.D.S.
REPRINTED FROM DENTAL SURVEY, AUGUST, 1942
Filling Class V Cavities
With Gold Foil
RAPID TECHNIC EMPLOYS PNEUMATIC PLUGGER
W. E. HARPER, D.D.S.
The moth-eaten argument that gold foil fillings have no place in modern dental practice may have been valid yesterday, but it does not hold true today. With the advent of the pneumatic plugger and the combined use of cohesive and non-cohesive foil, these fillings can now he inserted in much less time than it takes to wax up and cast an in-lay. Furthermore, only one visit is required by the patient and no apology is needed for the restorations—they are the best that can be made.
I shall confine my remarks to the filling of Class V (gingival third) cavities, since I believe they are the type in which gold foil is most often indicated.
The rubber dam is used in all cases. After it is in place on the teeth, I pull it slightly away from the tooth that is to be filled (enough to expose the margin of the gum) and apply a Ferrier clamp, forcing the gum down to the desired point and leaving the carious area fully exposed. The buccal jaw of this clamp should he sharp so it will not slip.
I usually place the regulation rubber dam clamp two teeth distal to the tooth to be filled so it will not interfere with the seating of the Ferrier clamp.
CAVITY PREPARATION
I prefer the modified rectangular-shaped cavity advocated by Dr. I. W. Ferrier. The preparation is started with a small, sharp inverted cone bur. This type of bur is not so likely to cause pain and it is not inclined to slip.
INSERTING THE FILLING
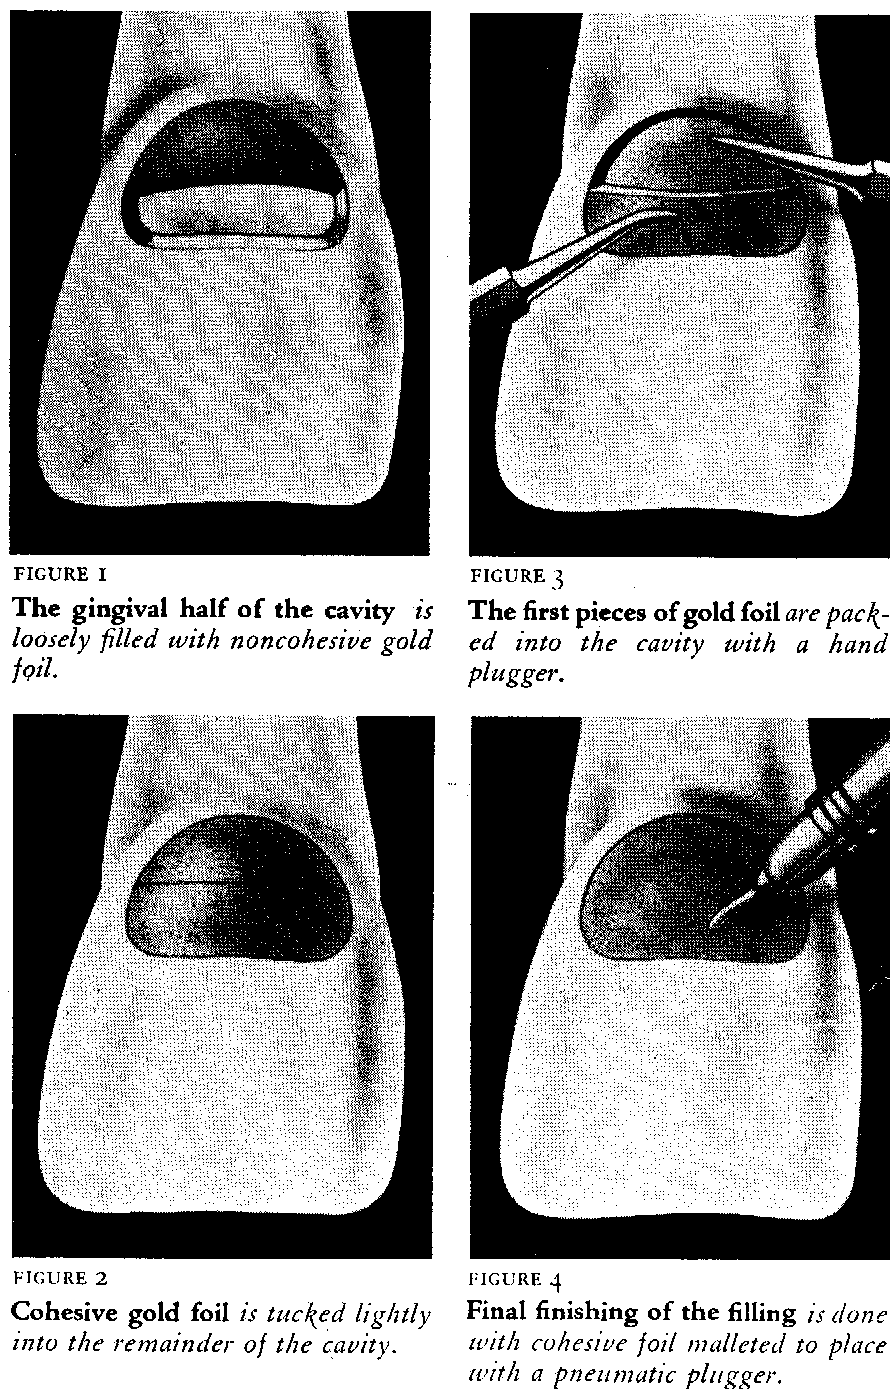
Non-cohesive foil is used to start the filling. A size 1/2 or 3/4 cylinder is placed in the cavity and pressed against the gingival wall with the beaks of the foil carrier. If the size of the cavity permits, a second or third cylinder is placed in position upon the first; in either event, enough room must be left to accommodate a piece of cohesive foil. Figure 1.
Next, place an inch or an inch and one-half of well annealed, size 0 rope cohesive foil in the space between the noncohesive foil, and the incisal wall of the cavity and pack it lightly to place. Figure 2. With a holding instrument hold the loose
foil in position and, with a round hand plugger, condense and anchor the cohesive foil in the angles formed by the floor of the cavity and the mesial, distal and incisal walls. When the cohesive foil is thoroughly condensed, change the direction of the plugger and condense the non-cohesive foil. Figure 3.
Final packing and condensation of the gold is done with Hollenbeck's pneumatic plugger, more cohesive foil being added until the cavity is completely filled. Figure 4.
ADVANTAGES OF THE PNEUMATIC PLUGGER
It is easy to hold and operate.
It strikes a uniform blow.
It makes for speedy operating.
It is less severe on the patient than an automatic mallet.
5. It does not require the aid of an assistant.
6. It will reach places inaccessible to straight hand pluggers or the automatic mallet, since it is provided with a contra-angle.
ADVANTAGES OF THE TECHNIC
There is less wear and tear on the operator; he is seated and can concentrate on his work.
The filling is completed in one operation.
There are no variable factors (humidity, temperature and the like) to contend with.
4. It produces the best filling that can he made.
Gold foil fillings are not recommended for the "slam-bang" type of dentist addicted to making "thumb nail" amalgam restorations. Nor is it recommended for the "fussy" dentist who is forever puttering around and never seems to know what instrument to use or when a given job is finished.
Neet Condit and Grout Bldg. Winchester, Ill.
| Index |